This chapter describes the system management node (SMN), how to install software on the SMN, and software operation. It covers these topics:
An SMN is generally required for SGI Altix UV 1000 systems and is optional for SGI Altix UV 100 systems.
A SATA controller with RAID 0 and RAID 1 support is available for the SMN. You need to order an SMN with two drives and configure them as RAID 1.
The SMN requires the following software components:
SUSE Linux Enterprise Server 11 Service Pack 1 (SLES 11 SP1) or Red Hat Enterprise Linux 6 (RHEL 6)
SGI Foundation Software 2.4
SGI System Management Software bundle
| Note: SGI Management Center (SMC) software is optional for provisioning, installing, configuring, operating, and monitoring SGI Altix UV 1000 and 100 series systems. The SGI Management Center System Administrator's Guide provides information on using the GUI to administer your Altix UV system. |
For the location of the SMN release notes, perform the following command:
uv44-smn:~ # rpm -ql sgi-smn-release /etc/opt/sgi/features/sgi-smn /etc/products.d/sgi-smn.prod /etc/sgi-smn-release /usr/share/doc/packages/sgi-smn-1/SGI-SMN-1.2-readme.txt /usr/share/doc/packages/sgi-smn-1/SGI-SMN-1.2-rpms.txt |
Both Altix UV 100 and 1000 system individual rack units (IRUs) use an embedded chassis management controller (CMC). The CMC communicates with both the blade-level board management controllers (BMCs) and the system management node (SMN). These components are generically known as the system control network. Remote administration requires that the SMN be connected by an Ethernet connection to a private or public Local Area Network (LAN).
The SMN can run SGI Management Center software. The SGI Management Center System Administrator's Guide provides information on using the GUI to administer your Altix UV 100 or Altix UV 1000 system.
For information on the CMC, see SGI UV CMC Controller Software User's Guide, SGI Altix UV 100 System User's Guide, or SGI Altix UV 1000 System User's Guide.
This chapter describes the system management node and covers the following topics:
The system control network configuration of your server will depend on the size of the system and control options selected. Typically, an Ethernet LAN connection to the system controller network is used.
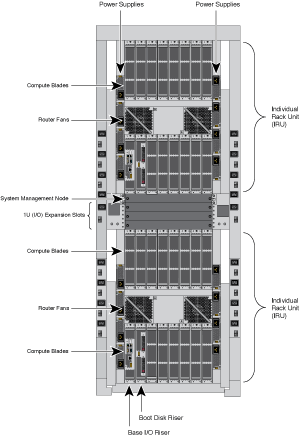
The SMN is a separate stand-alone server installed in the SGI Altix UV 1000 rack (see Figure 1-1). The SMN can be installed at the top of a UV rack or in one of the four 1U slots between the individual rack units (IRU), as shown in Figure 1-7. The SMN acts as a gateway and buffer between the Altix UV system control network and any other public or private local area networks. The Altix UV system control network will generally include the following three areas:
The system management node (SMN)
The chassis management controllers (CMC) boards - one per IRU
The individual blade-based board management controllers (BMC) - report to the CMCs
| Warning: The SGI Altix UV system control network is a private, closed network. It should not be reconfigured in any way to change it from the standard SGI Altix UV factory installation. It should not be directly connected to any other network. The Altix UV system control network is not designed for and does not accommodate additional network traffic, routing, address naming (other than its own schema), or DHCP controls (other than its own configuration). The Altix UV system control network also is not security hardened, nor is it tolerant of heavy network traffic, and is vulnerable to Denial of Service attacks. |
In all Altix UV 1000 servers all the system controller types (SMNs, CMCs and BMCs) communicate with each other in the following ways:
System control commands and communications are passed between the SMN and CMCs via a private dedicated Gigabit Ethernet. The CMCs communicate directly with the BMC in each installed blade by way of the IRU's internal backplane.
All the CMCs can communicate with each other via an Ethernet "string" configuration network.
In larger configurations the system control communication path includes a private, dedicated Ethernet switch.
For more detailed information on the SMN, see “System Management Node Ethernet Ports” in Chapter 2.
Each IRU contains a chassis management controller (CMC). Each CMC has seven Thereinto connectors that connect internally to the 48-port Ethernet switch (see Figure 1-2) The CMC communicates with compute blades via Intelligent Platform Management Interface (IPMI) protocol and monitors the individual rack unit (IRU) voltages and temperatures. The Ethernet ports on the CMC connect to the SMN and CMCs in other IRUs. You can communicate with the CMC via ssh or serial protocol.

The Ethernet ports are used as follows:
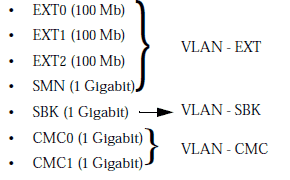
The CMC0 and CMC1 jacks are used to connect all the CMCs in a ring.
The SBK jack is used to interconnect building blocks into another ring. Up to four building blocks may be interconnected creating a Super block (SBK). Using only the SBK jacks on the CMCs for these connections, connect a cable from a CMC in the first building block to a CMC in the second building block. Then select another CMC in the second building block and connect it to a CMC in the third building block (or back to a CMC in the first building block in the case of only two building blocks). To minimize network hops, its recommended that the two connections within a building block be in different racks (for redundancy) and that the two racks be adjacently cabled with respect to the CMC ring.
One system management node (SMN) is required for each system. Systems with more than one partition or more than one building block will require a GigE switch. Systems with more than one Super Block will require two GigE switches.
The SMN should be connected to the SMN jack in a CMC that also has an SBK connection. The SMN requires a GigE switch to support connections to two different Super Blocks.
The EXT[0,1,2] jacks are used for connections from the smart door controller, and so on. The SMN jack can be used for other in-rack devices if its available and all SMNs in the configuration are already connected. Only the primary CMC SMN ports are to be used.
Figure 1-4 shows the Altix UV BaseIO riser card. The BaseIO riser card has the following electrical features:
One x4 serial attached SCSI (SAS) port
Two Gigabit Ethernet ports
Three universal serial bus (USB) 2.0 ports
One Video port
One RS-232 serial port
One BMC/ENET port
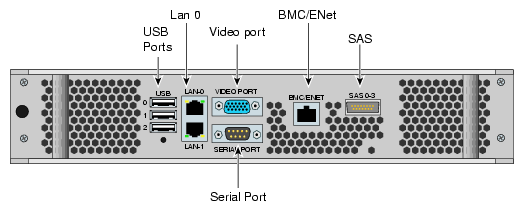
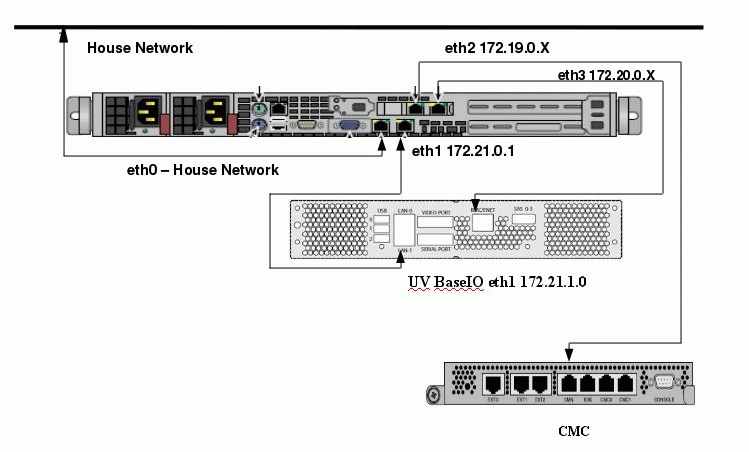
Figure 1-5 shows the an SMN Ethernet cabling example for a single Altix UV rack.
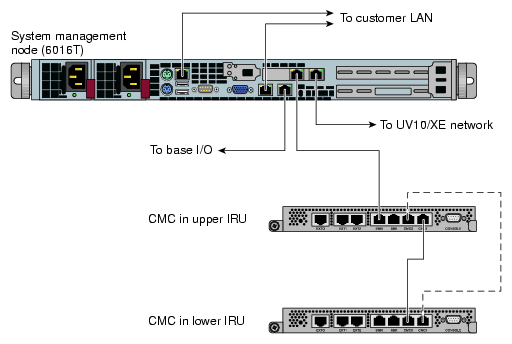
Figure 1-6 shows an example layout.
The UV command line interface is accessible by logging into either a system maintenance node (SMN) or chassis management controller (CMC).
Log in as root, when logging into the CMC, similar to the following:
# ssh root@hostname-cmc SGI Chassis Manager Controller, Firmware Rev. 1.1.11 CMC:r1i1c> |
Login as sysco, when logging into the SMN, similar to the following:
# ssh -X sysco@uv-system-smn sysco@system-smn:~/hw> |
Once a connection to the SMN or CMC is established, various system control commands can be entered.
The following CLI command options are available specifically for the SMN:
| -h|--help | This help message. | |||
| hh|--help | This help message + CLI help message. | |||
| -q|--quiet | No diagnostic message. | |||
| -s|--system | Select UV system. If only one system is present, this one is selected. Otherwise, this option is mandatory. | |||
| -S|--show depth | Show nodes at depth >= 1 using optional supplied pattern. Default pattern=* | |||
| -t|--target | One target in one of the two following formats: a. rack[/slot[/blade]] b. r{1..}[{s|i}{1..2}[{b|n}{0..15}]]
Examples: r1i02 = rack 1, slot 2 r2i1b4 = rack 2, slot 1, blade 4 |
Select the target from the CLI command itself, or, if not available, using the -t option.
The following are examples of uvcli commands:
| uvcli --help | This help. |
| uvcli --leds --help | Help on leds command. |
| uvcli leds r1i1b4 | Show leds on BMC located at rack 1, slot1, blade 4. |
| uvcli -t 1/1 leds | Show LEDs on all BMCs in rack 1, slot 1. |
| uvcli --leds -v r1i1 | Same as previous command but more verbose |
| uvcli -S 1 | Show all system serial numbers. |
| uvcli -S 1 '*/part*' | Show all system partitions. |
The following list of available CLI commands are specifically for the SMN:
| auth | Authenticate SSN/APPWT change | |
| bios | Perform BIOS actions | |
| bmc | Access the BMC shell | |
| cmc | Acess the CMC shell | |
| config | Show system configuration | |
| console | Access system consoles | |
| help | List available commands | |
| hel | Access hardware error logs | |
| hwcfg | Access hardware configuration variable | |
| leds | Display system LED values | |
| log | Display system controller logs | |
| power | Access power control/status | |
| Enter <cmd> --help | Get a help statement for individual commands |
The power command, also available on the chassis management controller (CMC), can be run from the SMN command line. When a power command is issued, it checks to see if the individual rack units (IRUs) are powered on; if not on, the power command powers up the IRUs and then the blades in the IRU are powered on.
To see a help statement for the power command, perform the following:
uv45-smn:~ # power --help usage: power [-vchosw] on|up [bmc] [--noio] [TARGET]... on|up turn power on bmc turn aux power on --noio do not power on accessories (IO) -v, --verbose verbose output -c, --clear clear EFI variables (system/partition targets only) -h, --hold hold in reset -o, --override override partition check -s, --single single node boot -w, --watch watch boot progress usage: power [-vo] off|down [bmc] [--noio] [--nochassis] [TARGET]... off|down turn power off bmc turn aux power off --noio do not power off accessories (IO) --nochassis do not power off chassis power -v, --verbose verbose output -o, --override override partition check usage: power [-vchosw] reset [bmc|iobmc] [TARGET]... reset system reset bmc|iobmc BMC reset -v, --verbose verbose output -c, --clear clear EFI variables (system/partition targets only) -h, --hold hold in reset -o, --override override partition check -s, --single single node boot -w, --watch watch boot progress usage: power [-vchosw] cycle [bmc] [--noio] [--nochassis] [TARGET]... cycle cycle power off on bmc cycle aux power --noio do not power cycle accessories (IO) --nochassis do not power cycle chassis power -v, --verbose verbose output -c, --clear clear EFI variables (system/partition targets only) -h, --hold hold in reset -o, --override override partition check -s, --single single node boot -w, --watch watch boot progress usage: power [-v10ud] [status] [TARGET]... status show power status -v, --verbose verbose output -1, --on show only blades with on status -0, --off show only blades with off status -u, --unknown show only blades with unknown status -d, --disabled show only blades with disabled status usage: power [-ov] nmi|debug [TARGET]... nmi|debug issue NMI -o, --override override partition check -v, --verbose verbose output usage: power [-v] margin [high|low|norm|] [TARGET]... margin power margin control high|low|norm| margin state -v, --verbose verbose output usage: power cancel [TARGET]... cancel cancel outstanding power action usage: power --help --help display this help and exit |
Use the console command (formerly, uvcon) to open a console to an Altix UV system.
To see a help statement for the console command, perform the following:
uv45-smn:~ # console --help

usage: console [-bnd23] [--steal] [--spy] [--kill] [--notty] [--nocache] [--clrcache] [[:]TARGET]
-b, --baseio                   specifies baseio bmc console
-n, -0, --normal               specifies node BMC console (normal channel)
-d, -1, --debug                specifies node BMC console (debug channel)
-2, --chan2                    specifies node BMC console (channel 2)
-3, --chan3                    specifies node BMC console (channel 3)
--steal                        steal the console
--spy                          spy the console
--kill                         kill all other uvcon sessions
--notty                        disables tty interventions
--nocache                      don't return cached output
--clrcache                     clear cached output
[:]TARGET                 console target

NOTE: When tty mode is enabled, use 'CTRL-]' 'q' to exit.

usage: console -d[band23c] [-l ] [TARGET]...
-d, --dump                     dump cached console output
-b, --baseio                   specifies baseio bmc console
-a, --all                      all node BMC consoles
-n, -0, --normal               specifies node BMC console (normal channel)
-d, -1, --debug                specifies node BMC console (debug channel)
-2, --chan2                    specifies node BMC console (channel 2)
-3, --chan3                    specifies node BMC console (channel 3)
-l, --lines=            limit output to last  lines
-c, --clear                    clear after dumping (-cc to clear without dumping)
TARGET                         console target(s)

usage: console --help
--help                         display this help and exit
|
For more detailed information on the commands available from the SMN or CMC and how to use them, see the SGI Altix UV CMC Controller Software User's Guide.
This section describes how to install software on the system management node itself.
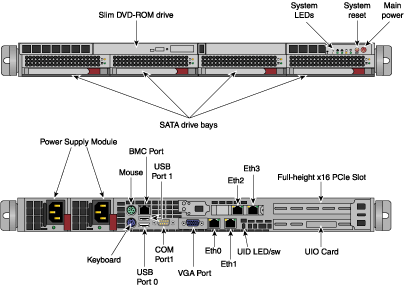
The system management node (SMN) is either located in the top 1U slot between the individual rack units (IRUs) or at the top of the rack as shown in Figure 1-7. Figure 1-8 shows an image of an SMN.
This section covers these topics:
This section describes how to install SLES 11 SP1 and SGI Foundation Software 2.4 on the SGI Altix UV system management node.
To install SLES 11 software images on the SMN, perform the following steps:
Turn on, reset, or reboot the SMN. The power on button is on the right of the SMN, as shown in Figure 1-8.
Insert the SLES 11 Service Pack 1 DVD in the DVD drive on the left of the SMN as shown in Figure 1-8.
Once installation of software on the system management node is complete, remove the DVD from the DVD drive.
After the reboot completes, you will eventually see the YaST2 - firstboot@Linux Welcome screen, as shown in Figure 1-9. Select the Next button to continue.

Note: The YaST2 Installation Tool has a main menu with sub-menus. You will be redirected back to the main menu, at various times, as you follow the steps in this procedure.
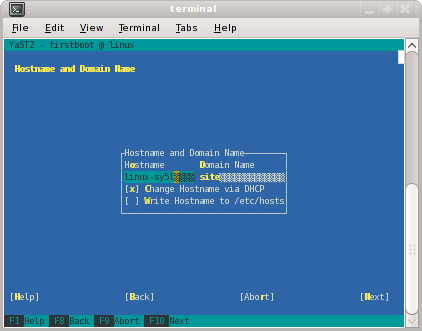
You will be prompted by YaST2 firstboot installer to enter your system details including the root password, network configuration, time zone, and so on.From the Hostname and Domain Name screen, as shown in Figure 1-10, enter the hostname and domain name of your system in the appropriate fields. Make sure that Change Hostname via DHCP is not selected (no x should appear in the box). Note that the hostname is saved to /etc/hosts in step 10, below. Click the Next button to continue.
Note: The mostly used keys are Tab and Shift + Tab to move forward and backward in modules, the arrow keys to move up and down or left and right in lists, the shortcuts (press Alt + highlighted letter) and Enter to execute the selected action or activate a menu item.
You can use Ctrl L to refresh the YaST screen as necessary.
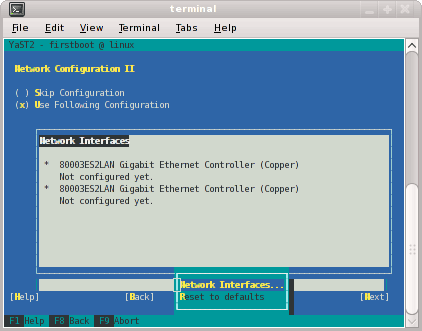
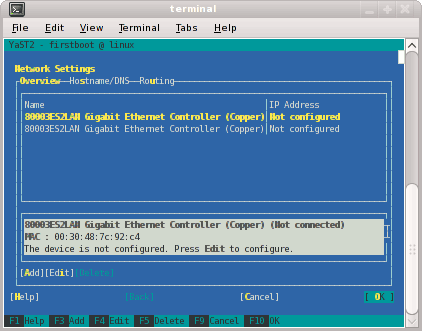
The Network Configuration II screen appears, as shown in Figure 1-11. Select Change and a small window pops up that lets you choose Network Interfaces... or Reset to Defaults. Choose Network Interfaces.
From the Network Settings screen, as shown in Figure 1-12, configure the first card under Name to establish the public network (sometimes called the house network) connection to your system management node (SMN). To do this, highlight the first card and select Edit.
Note: In SLES11, this screen is also where we will come back to in order to set up things like the default route and DNS. You can see all of those menu choices just to the right of Overview in Figure 1-12.
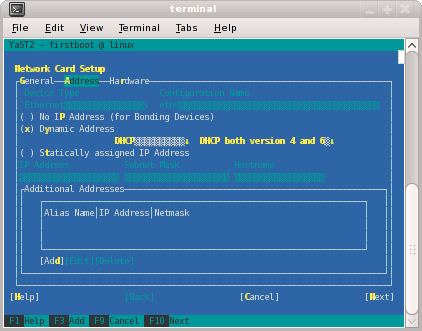
The Network Card Setup screen appears, as shown in Figure 1-13. SGI suggests using static IP addresses and not DHCP for admin nodes. Select Statically assigned IP Address. Once selected, you can enter the IP Address, Subnet Mask, and Hostname.
Note: You must use a fully qualified hostname (host + domain), such as, mysystem-admin.domainname .mycompany.com.
These are the settings for your admin node's house/public network interface. You will enter the default route, if needed, in a different step. Select Next to continue.
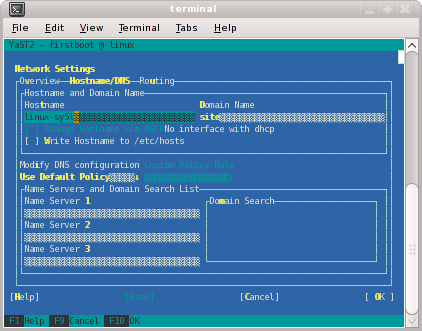
At this point, you are back at the Network Settings screen as shown in Figure 1-14. At this time, select Hostname/DNS. In this screen, you should enter your house/public network hostname and fully qualified domain names. In addition, any name servers for your house/public network should be supplied. Please select (ensure an x is in the box) for Write hostname to /etc/hosts. Do not select OK yet.
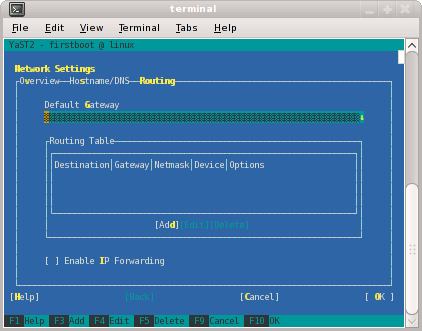
Select Routing shown in Figure 1-15 and enter your house/public network default router information there. Now you can select OK.
You are now back at the Network Configuration II screen, Click Next.
In the Clock and Time Zone screen, you can enter the appropriate details. Select Next to continue.
In the Password for the System Administrator "root"' screen, enter the password you wish to use. Select Next to continue.
In the User Authentication Method screen, most customers will want to stick with the default (Local). Select Next to continue.
In the New Local User screen, you can just select Next (and say Yes to the Empty User Login warning). Select Next to continue.
In Installation Completed, select Finish.
After you have completed the YaST first boot installation instructions, login into the SMN. You can use YaST2 to confirm or correct any configuration settings.
You need to install SGI Foundation 2.4 software at this point. For installation instructions, see “Installing SLES 11 SP1 and SGI Foundation Software 2.4 ”.
Note: The SGI System Management Node Software 1.2 Release Notes are available on SGI SupportFolio https://support.sgi.com/login.
Using YaST2 or manually using the rpm command, from the SGI-System-Management-Node-Software-1.2 ISO, install the following:rpm -i monit-5.0.3-1sgi703rp1.sles11.x86_64.rpm rpm -i monit-sgi-rules-5.0.3-1sgi703rp1.sles11.x86_64.rpm rpm -i sgi-base-smn-uv-1.0-sgi703rp3.sles11.x86_64.rpm rpm -i sgi-common-smn-uv-1.0-sgi703rp3.sles11.x86_64.rpm rpm -i sgi-db-smn-uv-1.0-sgi703rp3.sles11.x86_64.rpm rpm -i sgi-gather-smn-uv-1.0-sgi703rp3.sles11.x86_64.rpm rpm -i sgi-smn-docs-1-sgi703rp3.sles11.noarch.rpm rpm -i sgi-smn-release-1.2-sgi703rp31.sles11.noarch.rpm rpm -i sgi-snmpagent-smn-uv-1.0-sgi703rp3.sles11.x86_64.rpm rpm -i sgi-uv-bmc-1.2.5_5-20110121.noarch.rpm rpm -i sgi-uv-cmc-1.2.6_3-20110121.noarch.rpm rpm -i sgi-uv-iobmc-1.2.2_3-20110121.noarch.rpm rpm -i sysco-uv-1.0-20110118.1858sgi703rp1.sles11.x86_64.rpm rpm -i sysco-uv-libs-1.0-20110118.1858sgi703rp1.sles11.x86_64.rpm


The following set of instructions is based on an install using the physical product media. For other installation methods, see the product release notes.
For an overview of SLES11 SP1 installation, see the SUSE Linux Enterprise Server 11 Installation Quick Start (installquick.pdf). This document provides a quick overview of how to run through the default installation of SLES walking you through a number of installation screens. For detailed installation instructions, see the SUSE Linux Enterprise Server 11 Deployment Guide (deployment.pdf)
| Note: Documentation for SUSE Linux Enterprise Server 11 SP1 is located on your system in the /docu/en directory. |
To install SUSE Linux Enterprise Server 11 (SLES11) SP1 from the DVD media and SGI Foundation Software 2.4 as an add-on product, perform the following steps:
Insert the SLES 11 SP1 Installation DVD in the DVD drive and reboot your system.
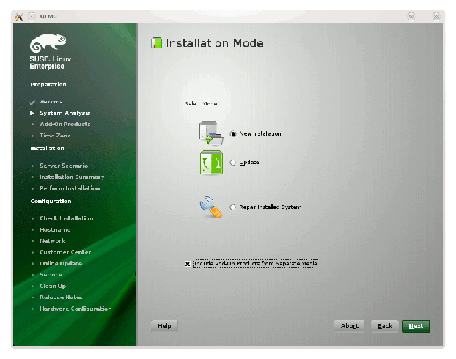
Follow the steps in the SUSE Linux Enterprise Server 11 Installation Quick Start. When you get to the Installation Mode screen, as shown in Figure 1-16, click the button next to Include Add-On Products from Separate Media and then click Next to continue.
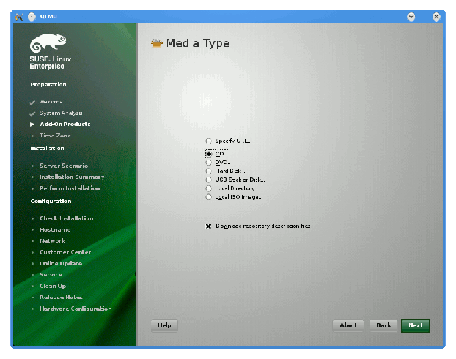
From the Media Type screen, shown in Figure 1-17, click the button to the left of CD.
The Insert the add-on product CD dialog box appears. Insert the SGI -Foundation-x86_64 CD into the drive and click the Continue button and then Next to proceed.
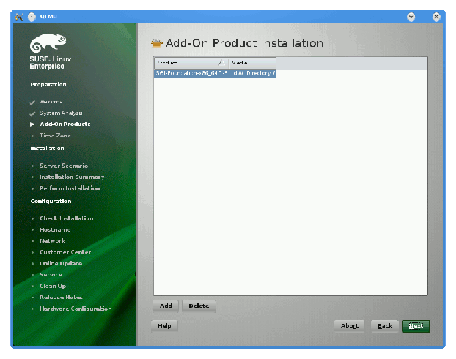
From the Add-On Product Installation screen, as shown in Figure 1-18, click on SGI-Foundation-x86_64 1-6 cd:///.Directory and click the Add button and then Next to proceed
Follow the SLES11 SP1 instructions to complete the installation.
This section describes how to install Red Hat Enterprise Linux 6 on the system management node.
Installation instructions for Red Hat Enterprise Linux 6 (RHEL 6) are contained in the Red Hat Enterprise Linux 6 Installation Guide available at http://docs.redhat.com/docs/en-US/Red_Hat_Enterprise_Linux/6/pdf/Installation_Guide/Red_Hat_Enterprise_Linux-6-Installation_Guide-en-US.pdf
These instructions assume that you have a VGA display or that you are able to remotely display X11 graphics. If you do not have a VGA display, you should connect from your workstation to the target server with the following command:
% ssh -X root@target-server |
To install RHEL 6 software images on the system management node, perform the following steps:
Insert the product media and enter the following command to mount it:
% mount /dev/cdrom/mnt
Run the following command and follow the examples provided:
% /mnt/create-yum-config-file
Additional installation instructions for installing SGI Foundation Software (SFS) 2.4 and RHEL 6 are provided in the SFS 2.4 release notes file.
By default RHEL 6 uses NetworkManager and all the directions here assume it is off. Perform the following commands, before proceeding:
# chkconfig NetworkManager off
# service NetworkManager stop
Add the IPADDR, NETMASK, and NETWORK values appropriate for the network interface to the /etc/sysconfig/network-scripts/ifcfg-eth0 file similar to the following example:
IPADDR=128.162.244.88
NETMASK=255.255.255.0
NETWORK=128.162.244.0
Create the /etc/sysconfig/network file similar to the following example:
[root@localhost ~]# cat /etc/sysconfig/network
NETWORKING=yes
HOSTNAME=my-system-admin
GATEWAY=128.162.244.1
Create the /etc/resolv.conf file similar to the following example:
[root@localhost ~]# cat /etc/resolv.conf
search domain-name.mycompany.com
nameserver 137.38.224.40
nameserver 137.38.31.248
nameserver 137.38.225.5
Add the IP address of the house network interface and the name(s) of the admin node to /etc/hosts file similar to the following example:
# echo "128.162.244.88 my-system-admin.domain-name.mycompany.com my-system-admin" >> /etc/hosts
Set the admin node hostname, as follows:
# hostname my-system-admin
Force the invalidation of the host cache of nscd with the nscd(8) command on the hosts file, as follows:
# nscd -i hosts
Restart the following services (in this order), as follows:
# /etc/init.d/network restart
# /etc/init.d/rpcbind start
# /etc/init.d/nfslock start
Set the local timezone. The timezone is set with /etc/localtime, a timezone definition file. The timezone defined in /etc/localtime can be determined, as follows:
# strings /etc/localtime | tail -1
CST6CDT,M3.2.0,M11.1.0
Link the appropriate timezone file from directory /usr/share/zoneinfo to /etc/localtime. For example, set timezone to Pacific Time / Los Angeles, as follows:
# /bin/cp -l /usr/share/zoneinfo/PST8PDT /etc/localtime.$$
# /bin/mv /etc/localtime.$$ /etc/localtime
Confirm the timezone, as follows:
# strings /etc/localtime | tail -1
PST8PDT,M3.2.0,M11.1.0
Set network time configuration. By default, the configuration in /etc/ntp.conf directs requests to public servers of the pool.ntp.org project. Use public servers from the http://www.pool.ntp.org/en/ project:
server 0.rhel.pool.ntp.org
server 1.rhel.pool.ntp.org
server 2.rhel.pool.ntp.org
You may need to modify this ntp configuration file to point at a time server on your network. Please do not remove any entries that serve the cluster networks. For example, to direct requests to, for example, my.corp.mycompany.com, comment/delete the pool entries and insert the local entry, as follows:
# Use public servers from the pool.ntp.org project.
# Please consider joining the pool (http://www.pool.ntp.org/join.html).
#server 0.rhel.pool.ntp.org
#server 1.rhel.pool.ntp.org
#server 2.rhel.pool.ntp.org
server my.corp.mycompany.com
Restart the ntp server, as follows:
# /etc/init.d/ntpd restart
Make sure you have registered with the Red Hat Network (RHN). If you have not yet registered, run the following command:
% /usr/bin/rhn_register
From the SGI-System-Management-Node-Software-1.2 ISO, install the following:
rpm -i monit-5.0.3-1sgi703rp2.rhel6.x86_64.rpm
rpm -i monit-sgi-rules-5.0.3-1sgi703rp2.rhel6.x86_64.rpm
rpm -i sgi-base-smn-uv-1.0-sgi703rp5.rhel6.x86_64.rpm
rpm -i sgi-common-smn-uv-1.0-sgi703rp5.rhel6.x86_64.rpm
rpm -i sgi-db-smn-uv-1.0-sgi703rp5.rhel6.x86_64.rpm
rpm -i sgi-gather-smn-uv-1.0-sgi703rp5.rhel6.x86_64.rpm
rpm -i sgi-smn-docs-1-sgi703rp12.rhel6.noarch.rpm
rpm -i sgi-smn-release-1.2-sgi703rp49.rhel6.noarch.rpm
rpm -i sgi-snmpagent-smn-uv-1.0-sgi703rp5.rhel6.x86_64.rpm
rpm -i sgi-uv-bmc-1.2.5_5-20110121.noarch.rpm
rpm -i sgi-uv-cmc-1.2.6_3-20110121.noarch.rpm
rpm -i sgi-uv-iobmc-1.2.2_3-20110121.noarch.rpm
rpm -i sysco-uv-1.0-20110118.1858sgi703rp2.rhel6.x86_64.rpm
rpm -i sysco-uv-libs-1.0-20110118.1858sgi703rp2.rhel6.x86_64.rpm
rpm -i sysco_uv-tools-1.6-20110121.i386.rpm
This sections describes where you can find installation instruction to install software on SGI Altix UV 100 and Altix UV 1000 systems.
To install and configure SLES 11 SP1 and SGI Foundation Software 2.4 on an SGI Altix UV 100 or Altix UV 1000 system, see the appropriate sections in the SGI Altix UV Systems Software Install Guide .
To install and configure RHEL 6 and SGI Foundation Software 2.4 on an SGI Altix UV 100 or Altix UV 1000 system, see the appropriate sections in the SGI Altix UV Systems Software Install Guide.
For this release, there is an RPM on the SMN media that is installed on each single-system image (SSI).
SLES 11
rpm -i sysco-uv-smnconfig-1.0-20110118.1858sgi703rp1.sles11.x86_64.rpm
RHEL 6
rpm -i sysco-uv-smnconfig-1.0-20110118.1858sgi703rp2.rhel6.x86_64.rpm
For information on how to install SGI Management Center (SMC) software, see the SGI Management Center Installation and Configuration guide available at http://docs.sgi.com. In particular, see Chapter 1, “Installing SGI Management Center” and “Install Management Center Payload” section in Chapter 4, “Creating Payloads and Images”.
A set of commands is available from the system management node (SMN) to update Altix UV firmware. The general syntax for the tool is, as follows:
flashXXX [-r] <image name> <CMC host/IP> [... <CMC host/IP> |
There are three firmware flashing commands based on the general syntax, above:
flashcmc
flashbmc
flashiobmc
These tools have the following in common:
These tools are run from the SMN.
The commands update the specified image, but will not reboot the updated BMCs or CMCs. When you specify the -r option, the updated BMCs/CMCs are reset/rebooted so that the firmware update takes effect immediately.
The flash tools flash the entire system, not just the CMC specified on the command line. When flashing multi-IRU systems you must specify only one CMC hostname.
For SGI service personnel, when updating these images where the firmware archives is not directly accessible (from an SMN or at a customer site), simply download the firmware binary and flash tool onto the SMN (or service laptop for updates on sites without SMNs) and run the flash tools as indicated below.
To update the system firmware, perform the following:
Obtain the latest firmware from SGI SupportFolio at https://support.sgi.com or from SGI site personnel.
Note: Firmware versions for the Node BMC, BaseIO BMC, and the CMC are likely to have different version numbers. See examples below. You can use the version command on the CMC, Node BMC, or BaseIO BMC to determine the current firmware level. For information on the version command, see Chapter 3. “Altix UV CMC Software Commands” in the SGI Altix UV CMC Controller Software User's Guide.
To update the Node BMC firmware on your SGI Altix UV 100 or Altix UV 1000 system, perform the following:
$ cd /usr/local/sysco/firmware/bmc/1.2.5
$ flashbmc -r uvbmc.bin* <CMC hostname/IP>
To update the BaseIO BMC firmware on your SGI Altix UV 100 or Altix UV 1000 system, perform the following:
$ cd /usr/local/sysco/firmware/iobmc/1.2.2
$ flashiobmc -r uvbaseio.bin* <CMC hostname/IP>
To update the CMC firmware on your SGI Altix UV 100 or Altix UV 1000 system, perform the following:
$ cd /usr/local/sysco/firmware/cmc/1.2.6
$ flashcmc -r cmc.bin* <CMC hostname/IP>
For information on the /smnbackup command, perform the following:
uv44-smn:~ # /smnbackup -h

Usage: /smnbackup [options]

Options:
  -h                            Display this message.

  -v                            Verbose Output
  -b <base dir>                 The base directory for your output files. Default is /data1
  -n <base filename>            The base file name for tarball,log,md5sum etc. Default is uv44-smn

  -x <additional excludes>      Add additional exclude params to tar.
         EX -x "--exclude ./path/to/exclude/* "

  -s                            Make SGI Prep Clone

  -p                            Make Prep Clone
         WARNING: This excludes things such as /opt/sgi/sgimc/vcs and ssh keys.
         WARNING: While including /opt/sgi/sgimc/images.

  -t                            Start the tar

Deprecated options:
    -l <log file name>          The file name of the log file. Default is uv44-smn.log
    -e <error log file name>    The file name of the error log file. Default is uv44-smn.error.log
    -c <checksum file name>     The file name of the checksum. Default is uv44-smn.md5sum


NOTE:
        Passing no arguments with the -t option creates the following files:
                /data1/uv44-smn.tar.gz
                /data1/uv44-smn.log
                /data1/uv44-smn.error.log
                /data1/uv44-smn.md5sum
|
The uv_con facility collects all SMN UV BaseIO UV consoles locally for consultation purposes. For a usage statement, perform the following:
uv44-smn:~ # uv_con -h
Usage: uv_con without arguments: same as "-s"
       uv_con -g [-v] [-k N ] [-n]
                     Get logs.
                        -v for verbosity.
                        -k(eep) default = 24.
                         0 = NO rotation.
       uv_con [-l]
                     List all available logs
       uv_con [-l] partition_number < partition_number > ...
                     Show log for all UV systems with partition.
                     More than 1 partitions can be requested.
                     Use * or "all" for all partitions.
       uv_con [-s] [-ro]
                     Show or list compressed/non-compressed logs.
                        -s: Browse  logs.
                        -r for reservse list.
                        -o to show /sysco/uv_con/old
                     Browser prompt for:
                        Log No.: .
                                 See 'h' for details.
                        How: m    for more
                             l    for less ( or empty line )
                             L    for less -R
                             See 'h' for details.
       uv_con -S Edit /etc/sysconfig/uv_con
       uv_con -C Edit /etc/cron.d/uv_con
uv_con -L Edit /etc/logrotate.d/uv_con |